模組間的解耦合:發佈/訂閱模型
Observer Pattern 是物件導向常用的架構,例如多個 Chart 與單一 Data Source 的互動,就可以使用 Observer Pattern 設計,好避免資料不同步的問題。而且 Observer Pattern 可以切開 Subject 跟 Observer,讓個別模組的功能更明確,修改副作用更小。
Golang 的哲學是簡單,語言上更強調小元件的延展與復用,例如使用組合取代繼承,使用 Goroutine 取代 Thread 等。本文會講解怎麼使用 channel 來實現 Observer Pattern,或者更現代的說法,實現 Publish/Subscribe 的架構,來建構彼此獨立的模組。
Introduce Observer Pattern
先來對 Observer Pattern 做個解說。依照 GoF 的物件導向經典《Design Pattern》,Observer Pattern 的需求場景是
定義對象間的一種一對多的依賴關係,當一個對象的狀態發生改變時,所有依賴於它的對象都得到通知並被自動更新。
我們可以想像成訂閱報紙的情境,當現在有個新的事件發生,所有有訂閱報紙的讀者,都可以收到最新的事件訊息,讀者可以根據這個訊息來採取反應,例如買賣股票、規劃行程、改變計劃等。報紙的發行人不知道讀者會採取什麼行動,它只負責將消息傳遞給讀者。
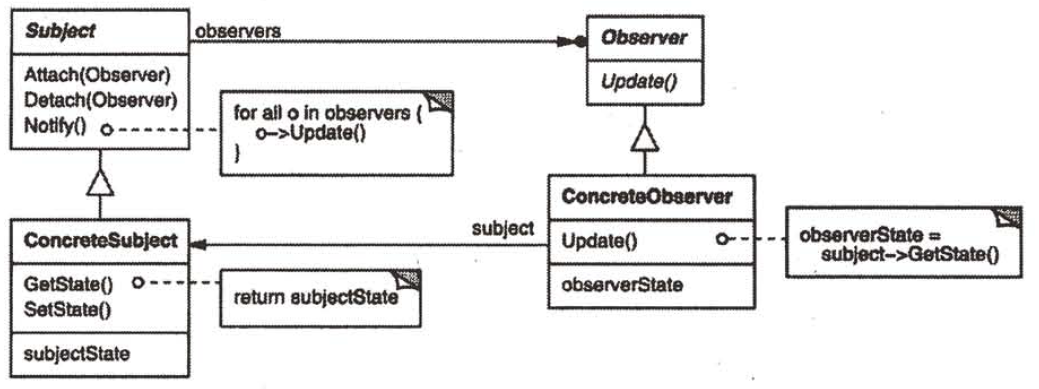
如果將 Observer Pattern 用 Class Diagram 來表示,會是

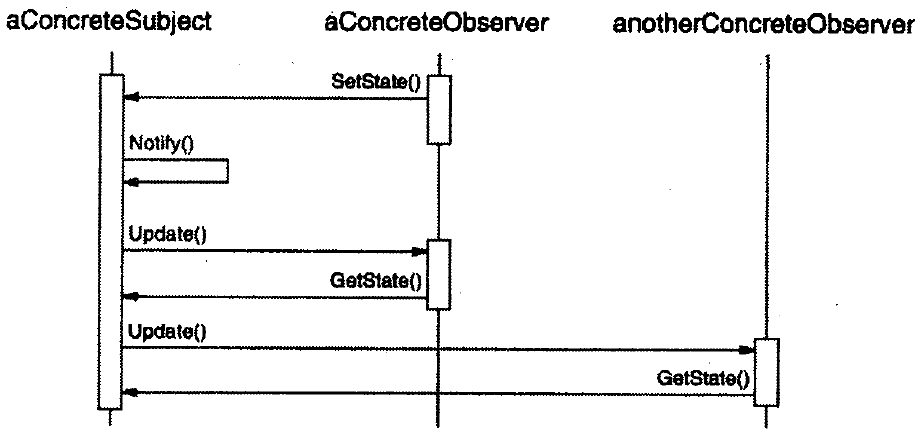
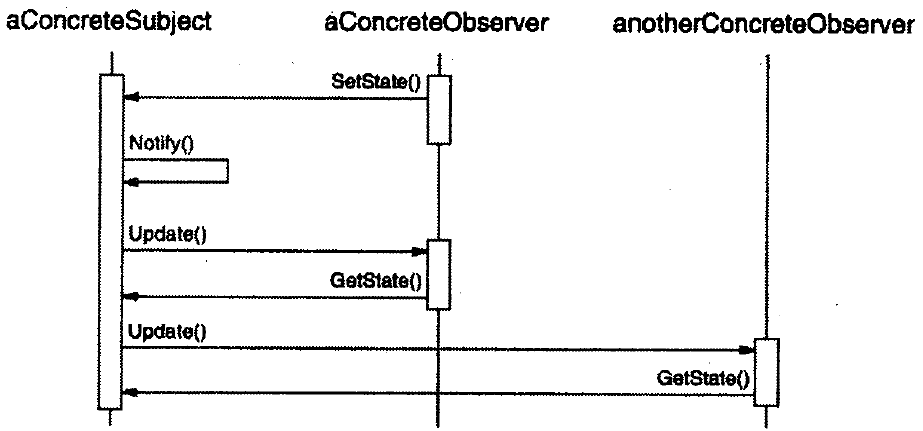
由圖中可以看到,主要分成兩個物件,Subject 知道有誰訂閱,當發生消息時,會 Notify 所有訂閱者,要求它們 Update;Observer 則實作 Update,會由 Subject 中取得最新資料,以供後續使用。將前後順序用 Sequence Diagram 來表示後,就會是

Design Pub/Sub Module
我們的需求是設計一個發佈/訂閱的模組,用於支撐商業邏輯的開發。這個模組類似於中間人的角色,發佈者透過這個模組來發佈訊息,模組也會負責將收到的訊息轉發給訂閱者。
專案架構為
project
├── cmd
├── pkg
│   └── pubsub
│       └── pubsub.go
├── scripts
│   └── build_win.bat
├── go.mod
└── README.md
完整的程式碼如下
package pubsub

import (
    "fmt"
    "sync"
)

// DataType is data type of message
type DataType string

// Client is a client of pub/sub pattern
type Client struct {
    writer  chan DataType
    readers []chan DataType
    mutex   sync.Mutex
}

// Pub publish message
func (m *Client) Pub(data DataType) {
    m.writer <- data
}

// Sub subscribe message
func (m *Client) Sub(handler func(DataType) error) {
    m.mutex.Lock()
    defer m.mutex.Unlock()
    readChannel := make(chan DataType, 10)
    m.readers = append(m.readers, readChannel)
    go func() {
        for {
            data := <-readChannel
            if err := handler(data); err != nil {
                fmt.Println(err)
            }
        }
    }()
}

// NewClient new a client
func NewClient() *Client {
    broker := &Client{
        writer: make(chan DataType, 10),
    }
    go func() {
        for {
            data := <-broker.writer
            for _, reader := range broker.readers {
                reader <- data
            }
        }
    }()
    return broker
}
一段一段來看。
首先定義訊息格式 DataType,假設為 string,但可依照需求自行定義,如果要傳輸的格式比較複雜,也可以定義成 struct
// DataType is data type of message
type DataType string
定義用戶端,讓創建此用戶端的人,可以進行 pub/sub。這邊用 channel 做為 pub/sub 溝通的管道。
channel 在 Golang 中,類似 Linux 的 pipeline 概念,常用於在兩個不同的 Go routine 間傳遞資料。

writer 這個 channel 用於接受發佈訊息,經由中間人的 Goroutine 後,會將訊息用各訂閱的 channel readers,轉交給訂閱者的 Goroutine
// Client is a client of pub/sub pattern
type Client struct {
    writer  chan DataType
    readers []chan DataType
    mutex   sync.Mutex
}
實現 pub 的邏輯,當使用者輸入訊息後,將此訊息丟到 channel 中
// Pub publish message
func (m *Client) Pub(data DataType) {
    m.writer <- data
}
實現 sub 的邏輯,當使用者訂閱時,創建一個新的 channel,並將它加入 readers 的陣容內,同時啟動 Goroutine,持續監聽這個 channel。如果有任何訊息進來,調用使用者註冊的 handler 來處理這則訊息。
Goroutine 是 Golang 的最大特色,類似其他語言中的 Thread,中文翻成協程,相對 Thread 輕量,適合用在高併發的場景。它的底層對應到內部的 scheduler,會根據當前的狀況來決定調用哪個 Goroutine。我們利用 Go routine 來實現 Publish/Subscribe 的架構,可以更有效率處理訂閱問題。
使用 Goroutine 只要用關鍵字 go 即可
// Sub subscribe message
func (m *Client) Sub(handler func(DataType) error) {
    m.mutex.Lock()
    defer m.mutex.Unlock()
    readChannel := make(chan DataType, 10)
    m.readers = append(m.readers, readChannel)
    go func() {
        for {
            data := <-readChannel
            if err := handler(data); err != nil {
                fmt.Println(err)
            }
        }
    }()
}
接著建立 writer 與 readers 間的轉發關係。
當 Client 初始化時,建立 writer,同時用 Goroutine 來監看 writer,如果 writer 內有任何的訊息,Goroutine 會遍歷 readers,將消息轉發給 readers。
// NewClient new a client
func NewClient() *Client {
    broker := &Client{
    writer: make(chan DataType, 10),
    }
    go func() {
        for {
            data := <-broker.writer
            for _, reader := range broker.readers {
                reader <- data
            }
        }
    }()
    return broker
}
Step 3: Use Pub/Sub Module
完成模組開發後,再來就是使用模組了,新增使用的主程式
project
├── cmd
│   └── pubsub
│       └── main.go
├── pkg
│   └── pubsub
│       └── pubsub.go
├── scripts
│   └── build_win.bat
├── go.mod
└── README.md
內容是
package main

import (
    "errors"
    "example/pkg/pubsub"
    "fmt"
    "time"
)

func main() {
    client := pubsub.NewClient()
    var printMessage func(pubsub.DataType) error
    printMessage = func(msg pubsub.DataType) error {
        if msg == "error" {
            return errors.New("this is an error")
        }
        fmt.Println(msg)
        return nil
    }
    client.Sub(printMessage)
    client.Pub("Hello")
    client.Pub("error")
    time.Sleep(time.Second)
}
使用模組內的初始化函式(因為 Golang 不是物件導向語言,沒有建構式),來取得要使用的 client
client := pubsub.NewClient()建立 handler 做為訂閱時的 callback function,當訂閱的訊息出現時,調用這個 handler 來處理。這裡建立的 handler 會判斷訊息是不是 error 這個字串,如果是的話,回傳錯誤訊息,否則正常印出訊息
var printMessage func(pubsub.DataType) error
printMessage = func(msg pubsub.DataType) error {
    if msg == "error" {
        return errors.New("this is an error")
    }
    fmt.Println(msg)
    return nil
}
最後訂閱與發佈訊息
用 Sub 註冊訂閱用的 handler;用 Pub 發佈訊息。發佈的訊息有兩則,第一則是正常訊息,內容是 Hello;第二則是 error 訊息,如果正常運行的話,會讓 handler 回傳錯誤
client.Sub(printMessage)
client.Pub("Hello")
client.Pub("error")
time.Sleep(time.Second)
實際執行
D:\git\golang-project>.\bin\pubsub.exe
Hello
this is an error
得到訊息內容跟 error!
Multiple Topic
在前面的設計中,已經可以進行發佈跟訂閱了,但如果想要訂閱多個主題,就需要建立多個 client,用起來很麻煩,這衍生出新的需求:我們需要擴充原來的介面,使它可以支持多主題訂閱
回去修改模組為
package pubsub

import (
    "fmt"
    "sync"
)

// DataType is data type of message
type DataType string

// MessageChannel is a channel of pub/sub pattern
type MessageChannel struct {
    writer  chan DataType
    readers []chan DataType
    mutex   sync.Mutex
}

// Client is client of pub/sub pattern
type Client struct {
    topic map[string]*MessageChannel
}

// Pub publish message
func (m *Client) Pub(topic string, data DataType) {
    m.topic[topic].writer <- data
}

// Sub subscribe message
func (m *Client) Sub(topic string, handler func(DataType) error) {
    m.topic[topic].mutex.Lock()
    defer m.topic[topic].mutex.Unlock()
    readChannel := make(chan DataType, 10)
    m.topic[topic].readers = append(m.topic[topic].readers, readChannel)
    go func() {
        for {
            data := <-readChannel
            if err := handler(data); err != nil {
                fmt.Println(err)
            }
        }
    }()
}

// AddTopic publish message
func (m *Client) AddTopic(topic string) {
    m.topic[topic] = &MessageChannel{
        writer: make(chan DataType, 10),
    }
    go func() {
        for {
            data := <-m.topic[topic].writer
            for _, reader := range m.topic[topic].readers {
                reader <- data
            }
        }
    }()
}

// NewClient new a client
func NewClient() *Client {
    client := &Client{
        topic: make(map[string]*MessageChannel),
    }
    return client
}
在原來的架構上,再抽象一層,重新命名原來的 Client 為 MessageChannel,負責各 Topic 的實際執行。上面則建立新的 Client,內部是一個 map,可以放置多個 MessageChannel,好實現多主題的訂閱
// MessageChannel is a channel of pub/sub pattern
type MessageChannel struct {
    writer  chan DataType
    readers []chan DataType
    mutex   sync.Mutex
}

// Client is client of pub/sub pattern
type Client struct {
    topic map[string]*MessageChannel
}
當 Pub/Sub 時,會取出對應 Topic 的 MessageChannel,進行 Pub/Sub
// Pub publish message
func (m *Client) Pub(topic string, data DataType) {
    m.topic[topic].writer <- data
}

// Sub subscribe message
func (m *Client) Sub(topic string, handler func(DataType) error) {
    m.topic[topic].mutex.Lock()
    defer m.topic[topic].mutex.Unlock()
    readChannel := make(chan DataType, 10)
    m.topic[topic].readers = append(m.topic[topic].readers, readChannel)
    go func() {
        for {
            data := <-readChannel
            if err := handler(data); err != nil {
                fmt.Println(err)
            }
        }
    }()
}
新增 AddTopic,當使用者要使用新的 Topic 時,會在內部建立轉發機制
// AddTopic publish message
func (m *Client) AddTopic(topic string) {
    m.topic[topic] = &MessageChannel{
        writer: make(chan DataType, 10),
    }
    go func() {
        for {
            data := <-m.topic[topic].writer
            for _, reader := range m.topic[topic].readers {
                reader <- data
            }
        }
    }()
}
同時修改使用的程式碼 main.go,改為
func main() {
    client := pubsub.NewClient()
    client.AddTopic("hello")
    client.AddTopic("echo")
    var printMessage = func(msg pubsub.DataType) error {
        if msg == "error" {
            return errors.New("This is an error")
        }
        fmt.Println(msg)
        return nil
    }
    var echoMessage = func(msg pubsub.DataType) error {
        fmt.Println(msg + " nice to meet you!")
        return nil
    }
    client.Sub("hello", printMessage)
    client.Sub("echo", echoMessage)
    client.Pub("hello", "Hello")
    client.Pub("hello", "error")
    client.Pub("echo", "Go")
    time.Sleep(time.Second)
}
在這個例子中,對 hello、echo 兩個 topic 進行訂閱
client.AddTopic("hello")
client.AddTopic("echo")
兩個訂閱有不同的 handler。echo 除了印出訊息外,也副加其他內容
var echoMessage = func(msg pubsub.DataType) error {
    fmt.Println(msg + " nice to meet you!")
    return nil
}
對兩個 Topic 進行發佈/訂閱
client.Sub("hello", printMessage)
client.Sub("echo", echoMessage)
client.Pub("hello", "Hello")
client.Pub("hello", "error")
client.Pub("echo", "Go")
確認成果
Go nice to meet you!
Hello
This is an error
小結
用 Golang 完成 Pub/Sub 模型後,可以回去跟標準的 Observer Pattern 比較。兩者的概念是類似的,中間都有一段程式碼負責轉發訊息,在 Observer Pattern 是 Notify,在我們的設計中,是 AddTopic 的 Goroutine。
Observer Pattern 在設計上,是由發佈者調用 Subject 的函式 SetState 來發佈訊息,再由各訂閱者自行調用 Subject 的函式來獲得訂閱的訊息,Subject 在中間只充當通知的角色。整個動作是由發佈者發起,並在發佈者的 thread 中執行,如果想要併發的效果,則需要另外設計。

Golang 由於有 Goroutine 跟 channel,在設計上可以更精巧,發佈者與訂閱者都有各自獨立的 Goroutine 在處理,效率高得多;而且因為有 channel 的存在,使得 Goroutine 推送或接收訊息時,無須理會其他模組的執行狀況,即使有 Fail 的情形,也不會影響到其他模組。簡單講,因為併發實現的成本降低了,可以更容易享受到併發的優勢。
在設計處理上,Golang 似乎認為 OOP 過早強調設計,導致編寫程式碼時,都需要先定義類別,這樣會讓程式碼因為類別而硬化,重構時需要反覆對類別進行 Push Up 跟 Push Down,有看過 Martin Fowler 的《Refactoring》應該會很有感,整本書的精神就在講如何重新設計類別。
Golang 的概念更偏向使用時才設計,例如處理函式不用放在事先定義的 Update 中,而是訂閱時才有的 echoMessage,某程度上,Golang 不強調模型,而是強調使用。