Goroutine 的併發治理:掌握生命週期
從併發的角度來看,Goroutine 跟 Thread 的概念很類似,都是將任務交給一個執行單元來處理。然而不同的是,Goroutine 將調度放在用戶態,因此更加輕量,也能避免多餘的 Context Switch。我們可以說,Go 的併發處理是由語言原生支援,有著更好的開發者體驗,但也因此更容易忘記底層仍存在著輕量成本,當這些成本積沙成塔,就會造成 Out of Memory。這篇文章會從 Goroutine 的生命週期切入,試著說明在併發的情境中,應該如何保持 Goroutine 的正常運作。
因為這篇講的內容會比較底層,如果對應用情境不熟的人,建議先看過同系列
再回來看這篇,應該會更容易理解。
Goroutine 的資源使用量
讓我們看個最簡單的例子,假設現在同時開 3M 個 Goroutine 來執行任務
var n int = 3 * 1e6

var ch = make(chan byte)
var wg sync.WaitGroup

func f(wg *sync.WaitGroup) {
    wg.Done()
    <-ch
}

func main() {
    wg.Add(n)

    for i := 0; i < n; i++ {
        go f(&wg)
    }
    wg.Wait()
}
每個 Goroutine 都有自己的 stack,也會需要一些配置放在 heap,天下沒有白吃的午餐,第一個問題是,一個 Goroutine 會消耗多少資源?的確,我們知道 Goroutine 相對 Thread 更為輕量,但這是個比較級的說法,當要評估系統效能時,會需要具體的數字,好在 Go 標準包的 runtime package 可以監控 Goroutine 的數量跟記憶體的使用情況
func main() {
    wg.Add(n)

    var m0 runtime.MemStats
    runtime.ReadMemStats(&m0)

    for i := 0; i < n; i++ {
        go f(&wg)
    }
    runtime.Gosched()
    runtime.GC()

    var m1 runtime.MemStats
    runtime.ReadMemStats(&m1)

    wg.Wait()

    fmt.Printf("Number of goroutines: %d\n", runtime.NumGoroutine())
    fmt.Printf("Per goroutine:\n")
    fmt.Printf("  Memory: %.2f bytes\n", float64(m1.Sys-m0.Sys)/float64(n))
}
這裡用 m0 紀錄啟動 Goroutine 前的記憶體使用量,再用 m1 紀錄啟動 Goroutine 後的記憶體使用量。執行後可以得到答案
Number of goroutines: 3000001
Per goroutine:
  Memory: 2731.46 bytes
  Time:   2.083068 µs
每個 Goroutine 的初始大小大約是 2.7KB。可能有人會好奇,這 2.7KB 怎麼來的?就讓我們捲起袖子進一步往下追,如果寫個最簡單的 Goroutine 程式
func main() {
    go func() {
        time.Sleep(time.Millisecond)
    }()
    time.Sleep(time.Second)
}
查看它的 assembly code,可以得到
go tool compile -N -l -S main.go

0x0014 00020 (main.go:6)        LEAQ    main.main.func1·f(SB), AX
0x001b 00027 (main.go:6)        PCDATA  $1, $0
0x001b 00027 (main.go:6)        NOP
0x0020 00032 (main.go:6)        CALL    runtime.newproc(SB)
0x0025 00037 (main.go:9)        MOVL    $1000000000, AX
0x002a 00042 (main.go:9)        CALL    time.Sleep(SB)
0x002f 00047 (main.go:10)       MOVQ    8(SP), BP
0x0034 00052 (main.go:10)       ADDQ    $16, SP
Goroutine 關鍵字所在的 L6 會編譯成對 runtime.newproc 的調用,繼續往下查,runtime.newproc 的程式碼是
// Create a new g running fn.
// Put it on the queue of g's waiting to run.
// The compiler turns a go statement into a call to this.
func newproc(fn *funcval) {
    gp := getg()
    pc := getcallerpc()
    systemstack(func() {
        newg := newproc1(fn, gp, pc)

        _p_ := getg().m.p.ptr()
        runqput(_p_, newg, true)

        if mainStarted {
            wakep()
        }
    })
}
runtime.newproc 會再調用 runtime.newproc1,裡面相關的段落有
// Create a new g in state _Grunnable, starting at fn. callerpc is the
// address of the go statement that created this. The caller is responsible
// for adding the new g to the scheduler.
func newproc1(fn *funcval, callergp *g, callerpc uintptr) *g {
  //...
    newg := gfget(_p_)
    if newg == nil {
        newg = malg(_StackMin)
        casgstatus(newg, _Gidle, _Gdead)
        allgadd(newg) // publishes with a g->status of Gdead so GC scanner doesn't look at uninitialized stack.
    }
  //...
}
gfget 會嘗試從空閒的 Goroutine 隊列中,取出可以使用的 Goroutine,「空閒」跟「隊列」牽涉到 Go 的排程器設計,有空再另外談,我們現在關心的是資源配置,如果 gfget 拿不到 Goroutine,就會用 malg 來分配記憶體,可以看到這裡使用常數 _StackMin 當參數,它的值是 2KB
// The minimum size of stack used by Go code_StackMin = 2048當然 Goroutine 還有一些其他的配置,但佔用最多的就是 stack,讓我們來想想,假設每個 stack 的配置空間是 2KB,1000 個 Goroutine 就至少需要吃掉 2MB 的記憶體空間。
1000 個併發才 2MB,難怪會被說是輕量。這個數字聽起來很 ok,現在的記憶體動輒 16G 以上,即使是最低階的 AWS EC2 t2.nano,也是 0.5GB 起跳,區區 2MB 根本不放在眼裡。但問題是,有沒有想過,這些資源什麼時間點會被釋放呢?通常我們使用 Goroutine,會搭配 for 跟 select 來監聽 input,讓 Goroutine 保持 listen 的狀態,例如
go func() {
  for {
    select {
      case <-ch:
        // do something
    }
  }
}
而很不幸的,這個寫法中,因為資源一直保持活躍,它不會被釋放。假設每次呼叫 func 都會創建 Goroutine,但它又不會被釋放,這就造成了 Memory Leak。Go 是有 GC 的語言,開發者不用花太多精神去管理資源的生命週期,但這不代表它不會洩漏,對 Goroutine 的不當使用就是一項 Memory Leak 的常見原因。
使用 Context 管理 Goroutine 上下文
Memory Leak 的主要問題在於「該釋放的資源沒被釋放」,本質上,它是資源生命週期管理的問題,Goroutine 的資源在什麼時間點會被釋放呢?當 Goroutine 執行完畢時,它會呼叫 runtime.goexit1
// Finishes execution of the current goroutine.
func goexit1() {
    if raceenabled {
        racegoend()
    }
    if trace.enabled {
        traceGoEnd()
    }
    mcall(goexit0)
}
runtime.goexit1 又會再輾轉呼叫到 gfput
// Put on gfree list.
// If local list is too long, transfer a batch to the global list.
func gfput(_p_ *p, gp *g) {
  //...
    if stksize != uintptr(startingStackSize) {
        // non-standard stack size - free it.
        stackfree(gp.stack)
        gp.stack.lo = 0
        gp.stack.hi = 0
        gp.stackguard0 = 0
    }
    _p_.gFree.push(gp)
    _p_.gFree.n++cont
  //...
}從程式碼可以看到,gfput 會釋放 stack,然後將 Goroutine 放到 Free List 中,等待下次使用。我們可以理解成,當 Goroutine 執行完畢後,它的資源就會被回收。
因此要管理 Goroutine 的生命週期,要訣就是讓它可以依照調用者的意思來脫離無窮迴圈。實作上,調用者會傳入一個 channel 當 input,Goroutine 監聽這個 input,只要有訊號出現,就結束 Goroutine 的執行
go func() {
    for {
        select {
        case <-finishCh:
            return
        case <-dataCh:
            // Do something
        }
    }
}()
但如果直接用原生的 channel 來管理 Goroutine 結束訊號,會變得非常麻煩。舉個例子,G1 會生出一個 G2,G2 會生出一個 G3,他們之間是 G1 -> G2 -> G3 的關係,現在希望上游取消時,下游也跟著取消,你可以理解成父資源的釋放也要讓子資源跟著釋放,因此 G1 需要創建一個 channel,然後傳給 G2, G3,同理,G2 也需要創建自己的 channel,傳給 G3,而 G3 會類似這樣
go func() {
    for {
        select {
        case <-g1Ch:
            return
        case <-g2Ch:
            return
        case <-dataCh:
            // Do something
        }
    }
}()
可想而知這會讓併發的開發變得麻煩,好在 Go 有內建的 context 包,可以讓開發者更容易管理 Goroutine 間的上下文關係。
Context 是個 interface,有 4 個 func,其中我們主要關心 Done(),這個 func 會傳回一個 channel,當 context 被取消時,這個 channel 會送出 struct{} 作為訊號
go func(ctx context.Context) {
    for {
        select {
        case <-ctx.Done():
            return
        case <-dataCh:
            // Do something
        }
    }
}(ctx)
你可能會覺得奇怪,Context 的 interface 中沒有 Cancel 這個 func,「取消」context 是什麼意思?這項設計反映了 Go 的 less is more 哲學,因為取消通常跟業務場景密切關聯,像是,有些人可能希望在取消的指令中放進更多資訊,因此 Go 不將具體的 Cancel 放在標準包中,只提供了 Done(),讓各家去實作,儘管如此,因為併發控制是非常常見的情境,Go 也有提供 WithCancel 讓開發者開箱即用。
對 WithCancel 的使用通常是
ctx, cancel := context.WithCancel(context.Background())
go func(ctx context.Context) {
    for {
        select {
        case <-ctx.Done():
            return
        case <-dataCh:
            // Do something
        }
    }
}(ctx)
// if you want to cancel goroutine
if IsExecption {
    cancel()
}
當調用 WithCancel 傳回的 cancel func 後,ctx.Done 就會送出結束訊號。它的原理是什麼?為什麼能簡化原本的 channel?事實上,Goroutine 間的調用關係可以理解成一個樹狀結構,假設每個 Goroutine 都持有各自的 context,那麼,context 間也能理解成是樹狀結構
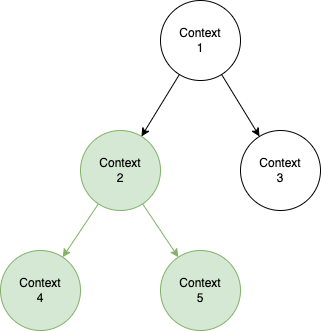
如果希望上游的 Context,像是 context 2 取消後,下游的 context 4, 5 也能跟著取消,直覺解法是使用 DFS,讓 context 2 的 cancel 遞迴呼叫下層的 cancel。
來看看 WithCancel 怎麼實現這個概念。WithCancel 會傳入一個 parent Context
// A cancelCtx can be canceled. When canceled, it also cancels any children
// that implement canceler.
type cancelCtx struct {
    Context

    mu       sync.Mutex            // protects following fields
    done     atomic.Value          // of chan struct{}, created lazily, closed by first cancel call
    children map[canceler]struct{} // set to nil by the first cancel call
    err      error                 // set to non-nil by the first cancel call
}

func WithCancel(parent Context) (ctx Context, cancel CancelFunc) {
    if parent == nil {
        panic("cannot create context from nil parent")
    }
    c := newCancelCtx(parent)
    propagateCancel(parent, &c)
    return &c, func() { c.cancel(true, Canceled) }
}

// newCancelCtx returns an initialized cancelCtx.
func newCancelCtx(parent Context) cancelCtx {
    return cancelCtx{Context: parent}
}
這個 parent context 會在 newCancelCtx 中被包進 cancelCtx 這個 struct,cancelCtx 同時實現了 Context 跟 canceler 的 interface,因此它也具有 cancel func。仔細觀察它的字段,Context 用來儲存上游 Context,children 則用來儲存下游 Context,對 cancelCtx 來說,它同時兼具了往上或往下查找的能力。
當執行 propagateCancel 時,parentCancelCtx 會在樹結構中向上搜尋,直到找到另一個 cancelCtx,然後將當前的 Context 掛進 parent context 的 children 中
// propagateCancel arranges for child to be canceled when parent is.
func propagateCancel(parent Context, child canceler) {
    //...
    if p, ok := parentCancelCtx(parent); ok {
        //...
            if p.children == nil {
                p.children = make(map[canceler]struct{})
            }
            p.children[child] = struct{}{}
        //...
    }
    //...
}
當 WithCancel 的 cancel 被執行時,它會呼叫 cancelCtx 的 cancel func
// cancel closes c.done, cancels each of c's children, and, if
// removeFromParent is true, removes c from its parent's children.
func (c *cancelCtx) cancel(removeFromParent bool, err error) {
    //...
    d, _ := c.done.Load().(chan struct{})
    if d == nil {
        c.done.Store(closedchan)
    } else {
        close(d)
    }
    for child := range c.children {
        // NOTE: acquiring the child's lock while holding parent's lock.
        child.cancel(false, err)
    }
    //...
    if removeFromParent {
        removeChild(c.Context, c)
    }
}
這邊做三件事,關閉 channel,取消所有 child Context,以及從 parent Context 中移除自己。完成這些事情後,所有 select ctx.Done() 的 Goroutine 都可以被釋放,而 context 本身也因為不再有人引用,會自動被 GC 回收。這裡有另一個常見的 Memory Leak,如果使用了 cancelContext,但卻沒有執行 cancel 指令的話,它會持續掛在 parent Context 底下而不會被回收掉,因此記得在離開 func 前,無論 Goroutine 是否有完成任務,都要執行 cancel()。
雖然程式碼看起來有些複雜,但原理很漂亮,利用 tree 做個雙向連結,就能有效管理 Goroutine 的生命週期,可能也是因為太好用了,基本上大家都用標準包的 Context,不太會看到自己實現 cancel 的例子。
搶占式設計
依照 CSP 的理論,Goroutine 內會是循序操作,這就意味著,雖然 Goroutine 會用 select 來監聽結束訊號,但如果當訊號發出時,Goroutine 正在忙碌中,它會將手中的任務忙完才會關閉 Goroutine。這是個好的特性,能確保 Goroutine 的關閉都是 Graceful,有經過妥善處理,但另一方面也引伸出一些新問題,例如,如果 Goroutine 的忙碌時間太久,久到沒辦法用 ctx.Done 來關閉的話呢?
go func(ctx context.Context) {
    for {
        select {
        case <-ctx.Done():
            return
        case <-dataCh:
            DoLongTimeJob()
        }
    }
}(ctx)
我們來看看 fasthttp 怎麼處理
func clientDoDeadline(req *Request, resp *Response, deadline time.Time, c clientDoer) error {
    timeout := -time.Since(deadline)
    //...
    var ch chan error
    //...
    var mu sync.Mutex
    var timedout, responded bool
    //...
    go func() {
        //...
        errDo := c.Do(reqCopy, respCopy)
        mu.Lock()
        {
            if !timedout {
                //...
                ch <- errDo
                responded = true
            }
        }
        mu.Unlock()
        //...
    }()

    tc := AcquireTimer(timeout)
    var err error
    select {
    case err = <-ch:
    case <-tc.C:
        mu.Lock()
        {
            if responded {
                err = <-ch
            } else {
                timedout = true
                err = ErrTimeout
            }
        }
        mu.Unlock()
    }
    //...
}
這個 func 用來處理帶有 timeout 的請求,我們將焦點擺在,fasthttp 是怎麼處理請求時間大於 timeout 的問題?func 主要分成兩塊,一塊是 select,會等待請求完成,或者請求超時;另一塊是 Goroutine,會執行請求,並將結果傳給 select 監聽的 channel。因為 select 會阻塞等待結果或超時,這就達到了類似搶占式的效果,只要一超時,func 就立刻返回,不會再等待。
那 Goroutine 呢?這裡的 Goroutine 像是用後即棄的資源,它在超時後依然會繼續執行,只是 final statement 的操作都不會放在裡面,不影響 Graceful shutdown。假設 Goroutine 在很久後的某個時間點執行完畢,它看到被放生了,就會默默自行關閉。這給了我們一個提示:重要的不僅是知道 Goroutine 何時關閉,也要知道 Goroutine 關閉前需要處置哪些資源。
執行期間的異常狀況
前面的例子都在討論怎麼讓 Goroutine 能夠關閉,不要永久佔用資源,但另一方面,Goroutine 也可能因為種種原因突然關閉,例如程式設計不當,存取了 nil address,或是沒設計好 critical section 導致 concurrency access,當然,還有重複關閉 channel。
為了保證 Goroutine 的錯誤不會造成系統崩潰,通常會在 Goroutine 中放入 recover,確保它能留下錯誤訊息然後結束
go func() {
    defer func() {
        if err := recover(); err != nil {
            fmt.Println(err)
        }
    }()
    panic("panic")
}()
另外,Goroutine 也可能在執行期間出現 Dead Lock,導致任務無法正常執行,像這樣無法正常運作的 Goroutine 稱為 unhealthy,要如何確認 Goroutine 是不是 healthy 呢?最簡單的方式,就是定期打 heartbeat 出來,只要 heartbeat 有正常送出,代表 Goroutine 仍然在正常運行。
讓我們看個例子,底下是由 Concurrency In Go 中取出的簡化版本
func main() {
    const timeout = 2 * time.Second
    dataCh := make(chan interface{})
    heartbeat := doWork(context.TODO(), timeout/2, dataCh)
    for i := 0; i <= 10; i++ {
        dataCh <- i
        select {
        case <-heartbeat:
            fmt.Println("receive heartbeat")
        case <-time.After(timeout):
            fmt.Println("worker goroutine is not healthy!")
            return
        }
    }
}
這個範例會透過 dataCh 將資料傳給 doWork 內的 Goroutine 處理,同時在外面定期接收一個 1s 的 heartbeat,如果 2s 沒收到,就判定 Goroutine unhealthy,印出錯誤訊息。
func doWork(ctx context.Context, pulseInterval time.Duration, dataCh <-chan interface{}) <-chan interface{} {
    heartbeat := make(chan interface{})
    go func() {
        pulse := time.Tick(pulseInterval)
        sendPulse := func() {
            select {
            case heartbeat <- struct{}{}:
            default:
            }
        }
        for {
            select {
            case <-ctx.Done():  // <1>
                return
            case <-pulse:  // <2>
                sendPulse()
            case i := <-dataCh:  // <3>
                fmt.Printf("processing %d\n", i)
                if i == 5 {
                    time.Sleep(10 * time.Second) // assume dead lock
                }
            }
        }
    }()
    return heartbeat
}
doWork 內會建立 heartbeat channel 並放入閉包中。閉包內有三種 input:(1) 收到 Done 就結束 Goroutine;(2) 收到 timer 的提醒就送出 heartbeat;(3) 收到 data 就進行處理。從 CSP input/output 的觀點來看,加上 heartbeat 就是替 Goroutine 多添上 1 個 input 跟 1 個 output。而因為 CSP 循序執行的特性,如果 (3) 處理太久,將阻塞其他 input 的進行,變相阻止了 (2) 的 output 的輸出,外面監聽的程式就能知道 Goroutine 已經 dead lock 了。
來執行一下
> go run main.go

processing 0
receive heartbeat
processing 1
receive heartbeat
processing 2
receive heartbeat
processing 3
receive heartbeat
processing 4
receive heartbeat
processing 5
worker goroutine is not healthy!
前面五個任務都正常運作,到第六個任務時,刻意讓 Goroutine 進入長時間睡眠,外頭監聽的 select 遲遲沒收到 heartbeat,就印出錯誤訊息並結束程式。
小結
這篇談的細節比較多,但核心概念都是「如何控制 Goroutine 的狀態」,在設計併發時,盡可能把握住幾個原則
- 每個 Goroutine 都要有結束條件
- 每個 Goroutine 都要有 recover 來捕捉 panic
- 關閉 Goroutine 前,注意相關的資源是不是都有釋放
- Goroutine 的處理任務盡可能簡單,讓它能保持無狀態
雖然像 heartbeat 這類技巧能更全面監控 Goroutine 的運行,但多少違反了簡單原則,在導入時要特別小心。如果有注意到的話,前面範例中的 heartbeat 不是直接用 time.Tick,而是包了一個 func 來送出,這是因為 receiver 要是沒有好好接收,反而會變成另一個 dead lock,塞住 Goroutine 的執行。
總之 Goroutine 不是免費的,我曾經遇過因為太方便開了一堆,結果峰值流量衝進來,直接打掛服務,最後還是要用 ratelimit 跟 Worker Pool 來控制數量。也希望看完這篇後,大家都能避免無意間埋下 OOM 的地雷。