GORM:從建置到 CRUD
進行後端開發時,少不了要使用資料庫,由於資料庫的設計與使用方式偏向函數思維,跟主流的物件導向習慣不同,因此很多語言都有對應的 ORM 套件,用來將資料庫轉為物件,方便開發者使用。
Golang 同樣有許多第三方的 ORM 套件,例如 lib/pq、go-pg、gorm、pgx,其中 gorm 是 GitHub 上星星數較多的專案,而且能對應到不同類型的資料庫,在 Golang 中常被使用。本文會講解如何使用 gorm 來操作 Postgres,順帶走一次後端資料庫開發的基本流程。
Establish Database
既然要使用 ORM 來開發資料庫,當然要先有資料庫啦。Postgres 是常用到的關聯式資料,它是 web based,支援高併發,相對傳統的 SQLite 等 file based 的資料庫,更適合網路應用。
要安裝 Postgres,可以用
choco install postgresql -y安裝包會安裝 Postgres 的程式本體,還有一些命令行工具,使用這些工具可以不用進到 Postgres 的互動介面,就能操作資料庫。
接著,在專案目錄下新增資料庫資料夾,存放資料以及相關檔案
project
├── cmd
├── data
│   └── postgres
├── pkg
├── scripts
├── go.mod
└── README.md
使用命令行工具 initdb 來初始化資料庫
initdb.exe -D ./data/postgres -U postgres-D 是指定資料夾;-U 是指定 user。初始化後,可以看到 data/postgres 資料夾下產生出許多新檔案。
有資料庫後,要將這個資料庫的服務連上網路,讓使用者使用。可以用命令行工具 pg_ctl 來執行
pg_ctl.exe -D ./data/postgres -l logfile start-l 是 log 的位置。
執行後可以看到
waiting for server to start.... done
server started
伺服器啟動成功。
在開始使用資料庫前,需要先制定資料庫的表格結構(schema),告訴使用者資料庫有哪些欄位,資料格式是什麼,這些資料定義語言通常會用 sql 描述。
為做到這件事,在 scripts 中建立一個 sql 檔案
project
├── cmd
├── data
│   └── postgres
├── pkg
├── scripts
│   └── postgres
│       └── initialize.sql
├── go.mod
└── README.md
內容是
CREATE TABLE players (
    id SERIAL PRIMARY KEY,
    age SMALLINT NOT NULL,
    username VARCHAR(50) NOT NULL,
    budget INTEGER
);
意思是要創建一張名為 players 的表格,用來記錄比賽選手的資料。表格中有 id、age、username、budget 四個欄位。其中 id 是會自行增加的整數,也是主 key,用來當索引;age 是整數,不得為空;username 是字串,長度最多 50,不得為空;budget 是整數。
接著用 psql 來操作 sql
psql -U postgres -d postgres -f scripts/postgres/initialize.sql執行後,剛剛的 sql 生效,資料庫初始化完成。
Connect with pgadmin
雖然說資料庫初始化完成,但看不到實體,還是沒有實感。這時可以先用互動式的命令行界面來看
psql -U postgres登入後,輸入搜尋語句
postgres=# select * from players;
id | age | username | budget
----+-----+----------+--------
(0 rows)
如搜尋結果,表格格式跟剛剛創建的相同。
但如果每次查詢都要用命令行,需要記憶大量指令,操作起來不直覺,好在 Postgres 也有提供 GUI 讓使用者操作,安裝可以用
choco install pgadmin4 -y
安裝好後啟動,可以再右下角看到 pgAdmin4 的圖案
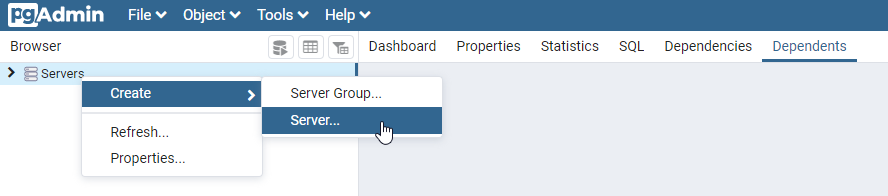
由於 pgAdmin4 是 web based 的客戶端,啟動後會開啟瀏覽器網頁。可以用 Create Server 將剛剛創建好的資料庫加入
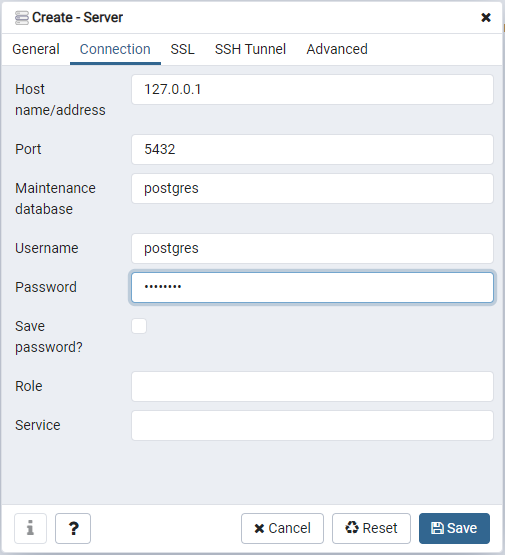
輸入帳號密碼後連線
在左邊的專案樹中出現連線到的 Server,底下能看到創建好的表格
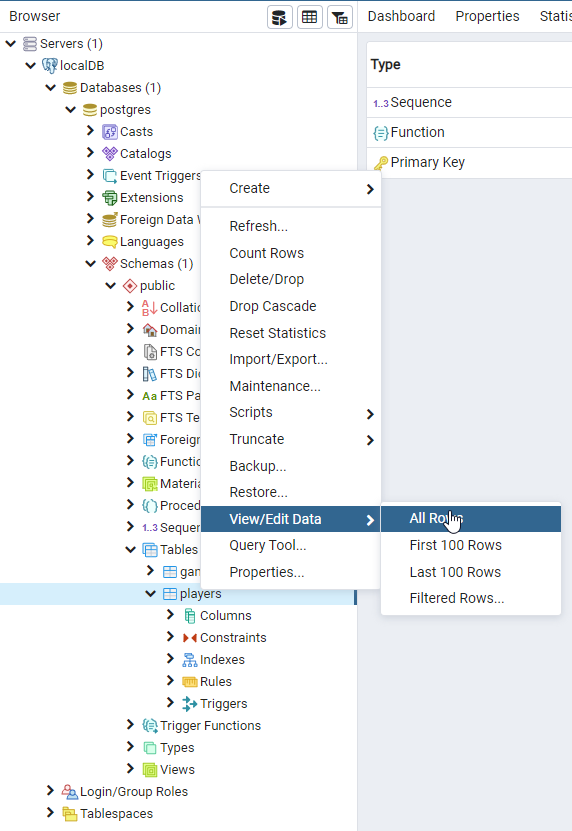
選擇 All Rows 後,就能瀏覽現在有的資料

當然,現在什麼都還沒有。
因為 web based 的設計,pgAdmin4 跟瀏覽器綁在一起,雖然適合分散式應用,但響應速度較慢、操作較麻煩,對開發初期或個人專案來講不是很方便。有些人會選擇 pgAdmin3 或是 dbeaver 這類 GUI,這邊就見仁見智,建議先都試試看,再選擇符合自己習慣的來使用。
Connect to Database
建置完資料庫後,開始來開發應用程式,建立 cmd 並在 configs 跟 pkg 下加入需要的檔案
project
├── cmd
│   └── postgres
│       └── main.go
├── configs
│   └── postgres
│       └── config.json
├── data
│   └── postgres
├── pkg
│   └── postgres
│       ├── client.go
│       └── config.go
├── scripts
│   └── postgres
│       └── initialize.sql
├── go.mod
└── README.md
pkg/client 用來建立資料庫的客戶端;pkg/config 用來設定資料庫。
引入 gorm
go get -u github.com/jinzhu/gormconfigs/config.json 的內容是
{
    "Addr": "127.0.0.1",
    "Port": 5432,
    "Username": "postgres",
    "Name": "postgres",
    "Password": "postgres"
}
表明連線的位置、端口、使用者帳密等。這些資訊可以用 Golang 在 pkg/config 讀出,內容是
package postgres

import (
    "encoding/json"
    "io/ioutil"
)

type dbConfig struct {
    Addr     string
    Port     int
    Username string
    Name     string
    Password string
}

func getDbConfig() *dbConfig {
    config := dbConfig{}
    file := "./configs/postgres/config.json"
    data, err := ioutil.ReadFile(file)
    err = json.Unmarshal(data, &config)
    if err != nil {
        panic(err)
    }
    return &config
}
有設定檔的資料後,Golang 可以在 pkg/client 根據設定來建立連線,內容是
package postgres

import (
    "github.com/jinzhu/gorm"
    // for postgres
    _ "github.com/jinzhu/gorm/dialects/postgres"
    "fmt"
)

type DBClient struct {
    client *gorm.DB
}

func (m *DBClient) Connect() {
    config := getDbConfig()
    client, err := gorm.Open(
        "postgres",
        fmt.Sprintf(
            "host=%s port=%d user=%s dbname=%s password=%s sslmode=disable",
            config.Addr,
            config.Port,
            config.Username,
            config.Name,
            config.Password,
        ),
    )
    if err != nil {
        panic(err)
    }
    m.client = client
}

func (m *DBClient) Disconnect() {
    m.client.Close()
}
主要的程式碼是
client, err := gorm.Open(
    "postgres",
    fmt.Sprintf(
        "host=%s port=%d user=%s dbname=%s password=%s sslmode=disable",
        config.Addr,
        config.Port,
        config.Username,
        config.Name,
        config.Password,
    ),
)
gorm 的設定很單純,只要指定連線的資料庫類型;再輸入對應的參數,就能進行連線。連線後會回傳 client 供後續操作。這邊將 client 保存到 m.client 中。
如果要中斷連線,則可以用
m.client.Close()有了 client 後,就能在 cmd/main.go 中使用它
package main

import (
    "example/pkg/postgres"
    "fmt"
)

func main() {
    client := postgres.DBClient{}
    client.Connect()
    client.Disconnect()
}
CRUD
CRUD 是資料庫的四種操作,分別是 Create/Read/Update/Delete。前面已經連上資料庫了,接著把 CRUD 給補齊
先來建模,新增 pkg/player.go
project
├── cmd
│   └── postgres
│       └── main.go
├── configs
│   └── postgres
│       └── config.json
├── data
│   └── postgres
├── pkg
│   └── postgres
│       ├── client.go
│       ├── player.go
│       └── config.go
├── scripts
│   └── postgres
│       └── initialize.sql
├── go.mod
└── README.md
內容跟前面建好的 schema 相同
package postgres

// Player is player
type Player struct {
    ID int
    Age int
    Username string
    Budget int
}
修改 client 的操作,加入 Create
func (m *DBClient) Insert(player Player) error {
    res := m.client.Create(&player)
    if res.Error != nil {
        return res.Error
    }
    return nil
}
簽名很直觀,應用端會傳入資料,client 將資料傳給資料庫,如果有錯誤就回報。
加入 Read
func (m *DBClient) Get() ([]Player, error) {
    players := []Player{}
    res := m.client.Order("id").Find(&players)
    if res.Error != nil {
        return nil, res.Error
    }
    return players, nil
}
這個稍微複雜點,client 用 Find 查詢資料,並將得到的資料 assign 給 struct,由於資料可能有多筆,要使用 slice。前面的 Order 是排序用,確保得到的資料會依照 id 來排。得到資料後,將資料回傳給應用端。
加入 Update
func (m *DBClient) Update(player Player) error {
    res := m.client.Save(&player)
    if res.Error != nil {
        return res.Error
    }
    return nil
}
這邊改用 Save 來保存資料;gorm 的 Save 是當資料不存在時,會創建資料,資料存在時,會更新資料。用來判斷存不存在的依據是 id,應用端傳下來的值應該要帶 id,才能有更新的效果。
加入 Delete
func (m *DBClient) Delete(player Player) error {
    res := m.client.Delete(&player)
    if res.Error != nil {
        return res.Error
    }
    return nil
}
很直觀,就是刪除,值得注意的是 gorm 有特別說明
Delete delete value match given conditions, if the value has primary key, then will including the primary key as condition
WARNING If model has DeletedAt field, GORM will only set field DeletedAt’s value to current time
記得要帶主 key,以免找不到條件而刪除整張表格;有時在資料庫應用中,因為有稽核與回滾的需求,不希望刪除資料,取而代之是使用標記的方式來表示該資料已經不被使用了。如果要標記刪除,可以用 DeletedAt 這個欄位。
建好 CRUD 後,在應用端也加入對應的使用
func main() {
client := postgres.DBClient{}
client.Connect()
player := postgres.Player{
Age: 18,
Username: "ken",
Budget: 1000,
}
client.Insert(player)
players, err := client.Get()
if err != nil {
fmt.Println(err)
}
if len(players) > 1 {
players[1].Budget = 2000
client.Update(players[1])
}
client.Disconnect()
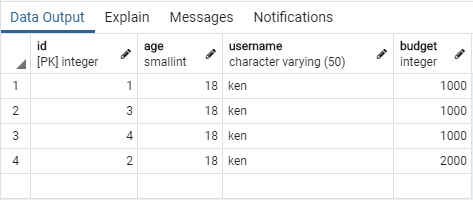
}編譯並執行程式碼,可以在 pgAdmin 上看到結果

執行多次,可以看到每次執行都會增加一筆,同時 id = 2 的資料 budget 被改成 2000
Join
有時候會需要同時取得兩張表格的資料,並合成一張大表格,在資料庫的操作中稱為 Join。來看一個情境,假設現在新增一張 games 的表格,用來表示比賽的地點、勝利選手、獎金。可以修改 sql 為
DROP TABLE IF EXISTS players;
DROP TABLE IF EXISTS games;

CREATE TABLE players (
    id SERIAL PRIMARY KEY,
    age SMALLINT NOT NULL,
    username VARCHAR(50) NOT NULL,
    budget INTEGER
);

CREATE TABLE games (
    id SERIAL PRIMARY KEY,
    winner_id SMALLINT NOT NULL,
    location VARCHAR(50) NOT NULL,
    prize INTEGER
);
並在 pkg 下建立新模型 game.go
project
├── cmd
│   └── postgres
│       └── main.go
├── configs
│   └── postgres
│       └── config.json
├── data
│   └── postgres
├── pkg
│   └── postgres
│       ├── client.go
│       ├── player.go
│       ├── game.go
│       └── config.go
├── scripts
│   └── postgres
│       └── initialize.sql
├── go.mod
└── README.md
內容是
package postgres

// Game is game
type Game struct {
    ID       int
    WinnerID int
    Location string
    Prize    int
}
現在有個需求,希望查詢選手時,能一併查詢出該選手贏得的比賽,這時就可以透過 Join 來完成。
在原本的 game.go 中新增一個擴增表格用的結構
// JoinResult is join result
type JoinResult struct {
    Player
    Game
}
因為 Golang 組合的特性,直接用兩個子結構合併即可。
在 client 的使用中新增 Join
func (m *DBClient) GetPlayerJoinGame() ([]JoinResult, error) {
    results := []JoinResult{}
    res := m.client.Table("players").Select("*").Joins("inner join games on players.id = games.winner_id").Scan(&results)
    if res.Error != nil {
        return nil, res.Error
    }
    return results, nil
}
Join 的條件是 player 的 id 等於 game 的 winner_id,就將兩者表示為同一列。得到的結果用 Scan 裝進 results 結構中。
用 pgAdmin 手動新增一筆 game 的資料

在應用端加入查詢,並印出
results, _ := client.GetPlayerJoinGame()
fmt.Println(results[0])
client.Disconnect()
編譯並執行,得到
{{2 18 ken 2000} {1 2 New York 3000}}前一個 {} 是選手的資料;後一個 {} 是比賽的資料。透過單次查詢,得到兩個表格的資料並放入同一個結構中。
小結
跑完 CRUD 後,覺得 gorm 的用法比想像中直覺,反而是前面建置資料庫的步驟比較麻煩。Golang 以組合來替代繼承的哲學,的確讓它在操作資料庫上顯得更輕巧。但錯誤處理的方式還是有些繁瑣,某程度上,會有種 Golang 希望開發者對於第三方套件保持警戒的味道在。
很有意思的是,如果使用 Wireshark 來看,gorm 的查詢會是

如果熟悉 Postgres 的通訊協定的話,也許可以成為效能優化的參考。