輕鬆上手約定式提交:Commitizen 初體驗
最近參加 DevOps Meetup 的活動,Speaker 提到團隊使用 Commitizen 這套工具來統一提交訊息的風格,當場就有種醍醐灌頂的感覺。我們團隊前陣子才 Suffer 在 Commit Style 分歧,知識管理效率低落,有時只有 commit 本人能看懂,而使用共同模板又太浪費時間,跟 Git 鼓勵 commit 的精神背道而馳。聽完後,真的是相見恨晚,完全命中我的痛點。
Commitizen 是由 AngularJS 的規範衍伸而來,各團隊可以依照需求自行調整,我們 Step by Step 來看看 Commitizen 的效果如何。
Install Node.js
因為 Commitizen 是使用 Node.js 開發,不免俗的,要裝一下 Node.js,Ubuntu 的安裝方式是
sudo apt install nodejs
sudo apt install npm
確認是否有安裝完成
ken@ken-Lenovo-ideapad-330-15ICH:~/git/git$ node -v
v8.10.0
ken@ken-Lenovo-ideapad-330-15ICH:~/git/git$ npm -v
3.5.2
Install Commitizen
接著使用 Node.js 的 Package Management 工具 npm 來安裝 Commitizen
npm install -g commitizen
echo '{ "path": "cz-conventional-changelog" }' > ~/.czrc
-g 是全域安裝的意思,如果沒有需要針對 Project 制定 Style,用全域安裝即可,.czrc 則是用來設定 template 的路徑。
Git Format
在預設的 format 中,commit comment 由三個部分組成
<head>
<body>
<footer>
讓我們看一個簡單的例子
commit 4030e040b6044de68b2750702a5b6065c887960c
Author: kenwschen <ken*****@[gmail.com](mailto:[email protected])>
Date:   Thu Nov 28 22:51:44 2019 +0800

feat(libhello): add hello file

hello, this is a longer description

fix #100
第一行是 head,也就是 title,通常會由
<type>(<scope>): <subject>
在本例中可以看成這個 commit 為新增功能(feature),更改的 module 是 libhello,簡單描述是 add hello file。
中間行是 body,代表詳細的描述,通常會說明要解決的問題是什麼,具體做法是什麼等等。
最後一行是 footer,通常會標明相關的 issue,如果沒有將 issue 跟 git 結合在一起的話,footer 可以不標。
Git cz
實際執行 Commitizen,使用 git cz 來取代 git commit

可以看到,Commitizen 會很貼心顯示選單讓 user 選擇,只要照著問題跟選單將答案填入就好,就是這麼簡單。
來看一下提交的結果
ken@ken-Lenovo-ideapad-330-15ICH:~/git$ echo hello > hello
ken@ken-Lenovo-ideapad-330-15ICH:~/git$ git add .
ken@ken-Lenovo-ideapad-330-15ICH:~/git$ git cz
[email protected], [email protected]

? Select the type of change that you're committing: feat:        A new feature
? What is the scope of this change (e.g. component or file name): (press enter to skip) libhello
? Write a short, imperative tense description of the change (max 84 chars):
    (14) add hello file
? Provide a longer description of the change: (press enter to skip)
    hello, this is a longer description
? Are there any breaking changes? No
? Does this change affect any open issues? No
[master 2e1ea38] feat(libhello): add hello file
    1 file changed, 1 insertion(+)
    create mode 100644 hello

ken@ken-Lenovo-ideapad-330-15ICH:~/git$ git log
commit 2e1ea3868dcf972c2499378ee9d5b3ac7ab654b6 (HEAD -> master)
Author: kenwschen <[ken*****@gmail.com](mailto:[email protected])>
Date:   Fri Nov 29 00:40:31 2019 +0800

feat(libhello): add hello file

hello, this is a longer description
是不是太美了!
Customize Format
如果專案有自訂格式,例如需要標註修改方式、修改目的等等,可以怎麼做?Commitizen 支援許多模板,其中 cz-customizable 有讓 user 自訂選項的彈性,先安裝起來
sudo npm install -g cz-customizable
echo '{ "path": "cz-customizable" }' > ~/.czrc
將配置項的範例複製到家目錄
cp /usr/local/lib/node_modules/cz-customizable/cz-config-EXAMPLE.js ~/.cz-config.js打開配置文件,可以看到其中有許多配置設定,假設現在需要新增一個互動問答,讓 user 輸入 commit 的 purpose,可以在其中加入
    messages: {
        type: "Select the type of change that you're committing:",
        scope: '\nDenote the SCOPE of this change (optional):',
        customScope: 'Denote the SCOPE of this change:',
        subject: 'Write a SHORT, IMPERATIVE tense description of the change:\n',
        body: 'Provide a LONGER description of the change (optional). Use "|" to break new line:\n',
        **bodyPurpose: 'The purpose of the change:\n',**
        breaking: 'List any BREAKING CHANGES (optional):\n',
        footer: 'List any ISSUES CLOSED by this change (optional). E.g.: #31, #34:\n',
        confirmCommit: 'Are you sure you want to proceed with the commit above?',
      },
其中 bodyPurpose 這行是新加入的選項。
接著修改問句文件
sudo vi /usr/local/lib/node_modules/cz-customizable/questions.js
在其中加入 bodyPurpose
    ...
    messages.body =
          messages.body || 'Provide a LONGER description of the change (optional). Use "|" to break new line:\n';
        **messages.bodyPurpose = messages.bodyPurpose || 'The purpose of the change:\n';**
        messages.breaking = messages.breaking || 'List any BREAKING CHANGES (optional):\n';
    ...

    ...
          {
            type: 'input',
            name: 'body',
            message: messages.body,
          },
          **{
            type: 'input',
            name: 'bodyPurpose',
            message: messages.bodyPurpose,
          },**
    ...
然後修改 commit 生成文件,將 bodyPurpose 加入
    let body = wrap(answers.body, wrapOptions) || '';
    **body = body + (wrap(answers.bodyPurpose, wrapOptions) || '');**
    body = addBreaklinesIfNeeded(body, config.breaklineChar);
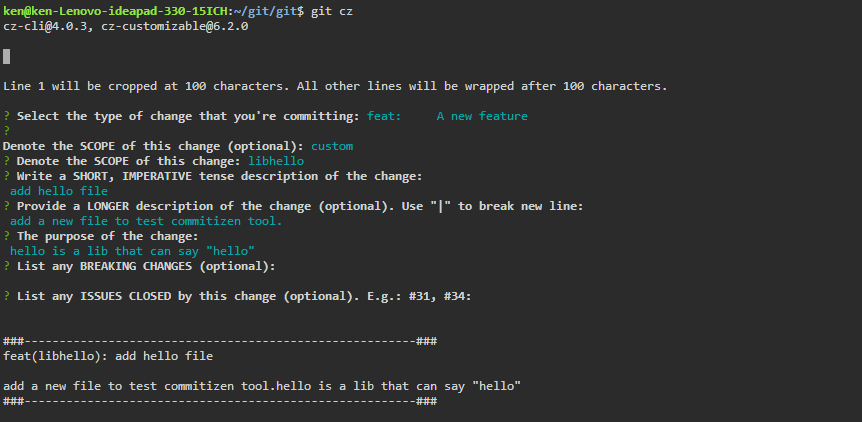
現在來看一下修改的成果

而實際的 log 是
commit 3cc8c9aa4a9084fb4b8faa651d98b5376f24e4d6 (HEAD -> master)
Author: kenwschen <[[email protected]](mailto:[email protected])>
Date:   Fri Nov 29 19:56:58 2019 +0800

feat(libhello): add hello file

add a new file to test commitizen tool. hello is a lib that can say "hello"
小結
有時候程式寫一寫,會忘記升級自己的工具,很多時候團隊遇到的問題不是人的問題,而是工具的問題,我們應該要盡量 align 目標,用工具時時提醒出發點在哪。commit comment 原本是為了溝通而存在,而 Commitizen 可以幫我們更好地去做這件事。