Conan:建置並管理 C/C++ 的產出物
以前我們討論過如何在 C/C++ 的專案中,使用 Conan 管理第三方套件。當開發應用程式時,只要用 Conan 就能引入現成的函式庫;但如果角色轉換,開發的不是應用程式,而是函式庫,為方便他人引用,就需要將函式庫打包成 Conan Package,並上傳到 Server。在常見的開發情境中,開發者既需要引用別人的函式庫,也期待自己的函式庫能讓別人引用。
本文會講解如何編寫 Conan 的 Recipe,打包 C/C++ 的函式庫,並在實際的應用程式中引用。
需要 Clone 程式碼的,可以到這裡。
Create Conan Project
既然要打包程式,就需要先建立起專案
mkdir conan-recipe && cd conan-recipe依照官方說明,可以用
conan new hello/0.0.1 -t來建立專案,hello/0.0.1 是套件名稱/版本。-t 是建立 test_package,後面可以用來測試。
下完指令後,目錄變成
conan-recipe
├── test_package
│   ├── CMakeLists.txt
│   ├── conanfile.py
│   └── example.cpp
├── conanfile.py
└── README.md
其中 conanfile 是 Recipe,負責用來描述 Package、建置 Library、打包 Package。Recipe 是食譜的意思,Conan 會依照 Recipe 中的描述,來烹煮程式碼。
test_package 是測試用的資料夾,現在還用不到,等到 Recipe 的工作都完成後,會再回頭來看。
Prepare Source Code
用 editor 打開 conanfile.py,前半段是
from conans import ConanFile, CMake, tools

class HelloConan(ConanFile):
    name = "hello"
    version = "0.0.1"
    license = "<Put the package license here>"
    author = "<Put your name here> <And your email here>"
    url = "<Package recipe repository url here, for issues about the package>"
    description = "<Description of Hello here>"
    topics = ("<Put some tag here>", "<here>", "<and here>")
    settings = "os", "compiler", "build_type", "arch"
    options = {"shared": [True, False]}
    default_options = {"shared": False}
    generators = "cmake"

    def source(self):
        self.run("git clone [https://github.com/conan-io/hello.git](https://github.com/conan-io/hello.git)")
Conan 是用 ConanFile Class 來描述需要的動作。要編寫一個 Recipe,就要創建一個 Class,繼承 ConanFile,並更改其中的 Field
class HelloConan(ConanFile):
    name = "hello"
Field 依照自己的需求,填入 license、author、url、description 等描述,這些欄位用來告知使用者套件資訊。
值得注意的是 source 這個 method,它用於創建原始碼環境,當原始碼跟 Recipe 在不同專案時很好用,例如,範例用的 hello 專案是放置於 conan 的 Git Repository,因此可以用
def source(self):
    self.run("git clone [https://github.com/conan-io/hello.git](https://github.com/conan-io/hello.git)")
從 Repository Clone 下來建立,建立原始碼的資料夾。
Recipe 的 information 跟 source 寫好後,執行命令,call source method
conan source . --source-folder=source. 是 Recipe 所在的目錄, — source-folder 是要創建的 source 資料夾名稱。
專案目錄會變成
conan-recipe
├── source
│   └── hello
│       └── ...
├── test_package
│   ├── CMakeLists.txt
│   ├── conanfile.py
│   └── example.cpp
├── conanfile.py
└── README.md
hello 已經從 GitHub 上 Clone 下來,放置於 source 資料夾。
Build Library
有原始碼後,緊接著來建置函式庫。
Conan Recipe 有支援幾款建置工具,如 CMake、MSBuild,如果 Source Code 內還沒有建置配置,建議可以用 CMake,跨平台兼容性更佳。
hello 專案中已經有 CMakeList.txt,因此使用 CMake 為建置工具,修改 conanfile.py,加入 build method,該 method 用於描述 build 的方式
from conans import ConanFile, CMake, tools
# ...
def build(self):
    cmake = CMake(self)
    cmake.configure(source_folder="hello")
    cmake.build()
執行 conan install 命令,將 conan 配置輸出到 build 資料夾,方便 CMake 引用
conan install . --install-folder=build. 是 Recipe 所在的目錄, — install-folder 配置要輸出的資料夾名稱。
專案目錄變成
conan-recipe
├── source
│   └── hello
│       └── ...
├── build
│   └── ...
├── test_package
│   ├── CMakeLists.txt
│   ├── conanfile.py
│   └── example.cpp
├── conanfile.py
└── README.md
在 build 資料夾進行建置,call build method
conan build . --source-folder=source --build-folder build產出函式庫跟應用程式
conan-recipe
├── source
│   └── hello
│       └── ...
├── build
│   ├── bin
│   │   └── greet
│   ├── lib
│   │   └── libhello.a
│   └── ...
├── test_package
│   ├── CMakeLists.txt
│   ├── conanfile.py
│   └── example.cpp
├── conanfile.py
└── README.md
試著執行看看
~/git/medium-example-c-cpp/conan-recipe$ ./build/bin/greet
Hello World Release!
Package Library
建置成功後,下步就是打包,回頭看 conanfile.py 的 package method
def package(self):
    self.copy("*.h", dst="include", src="hello")
    self.copy("*hello.lib", dst="lib", keep_path=False)
    self.copy("*.dll", dst="bin", keep_path=False)
    self.copy("*.so", dst="lib", keep_path=False)
    self.copy("*.dylib", dst="lib", keep_path=False)
    self.copy("*.a", dst="lib", keep_path=False)
指令很單純,將特定副檔名的檔案放到指定資料夾
執行方式也很簡單
conan package . --source-folder=source --build-folder build --package-folder=package. 是 Recipe 所在的目錄, — source-folder 是原始碼所在目錄; — build-folder 是建置目錄; — package-folder 是打包目錄。
確認打包內容
~/git/medium-example-c-cpp/conan-recipe$ tree ./package/
./package
├── conaninfo.txt
├── conanmanifest.txt
├── include
│   └── hello.h
└── lib
    └── libhello.a
關於不同目錄間的關係,可以參照下圖
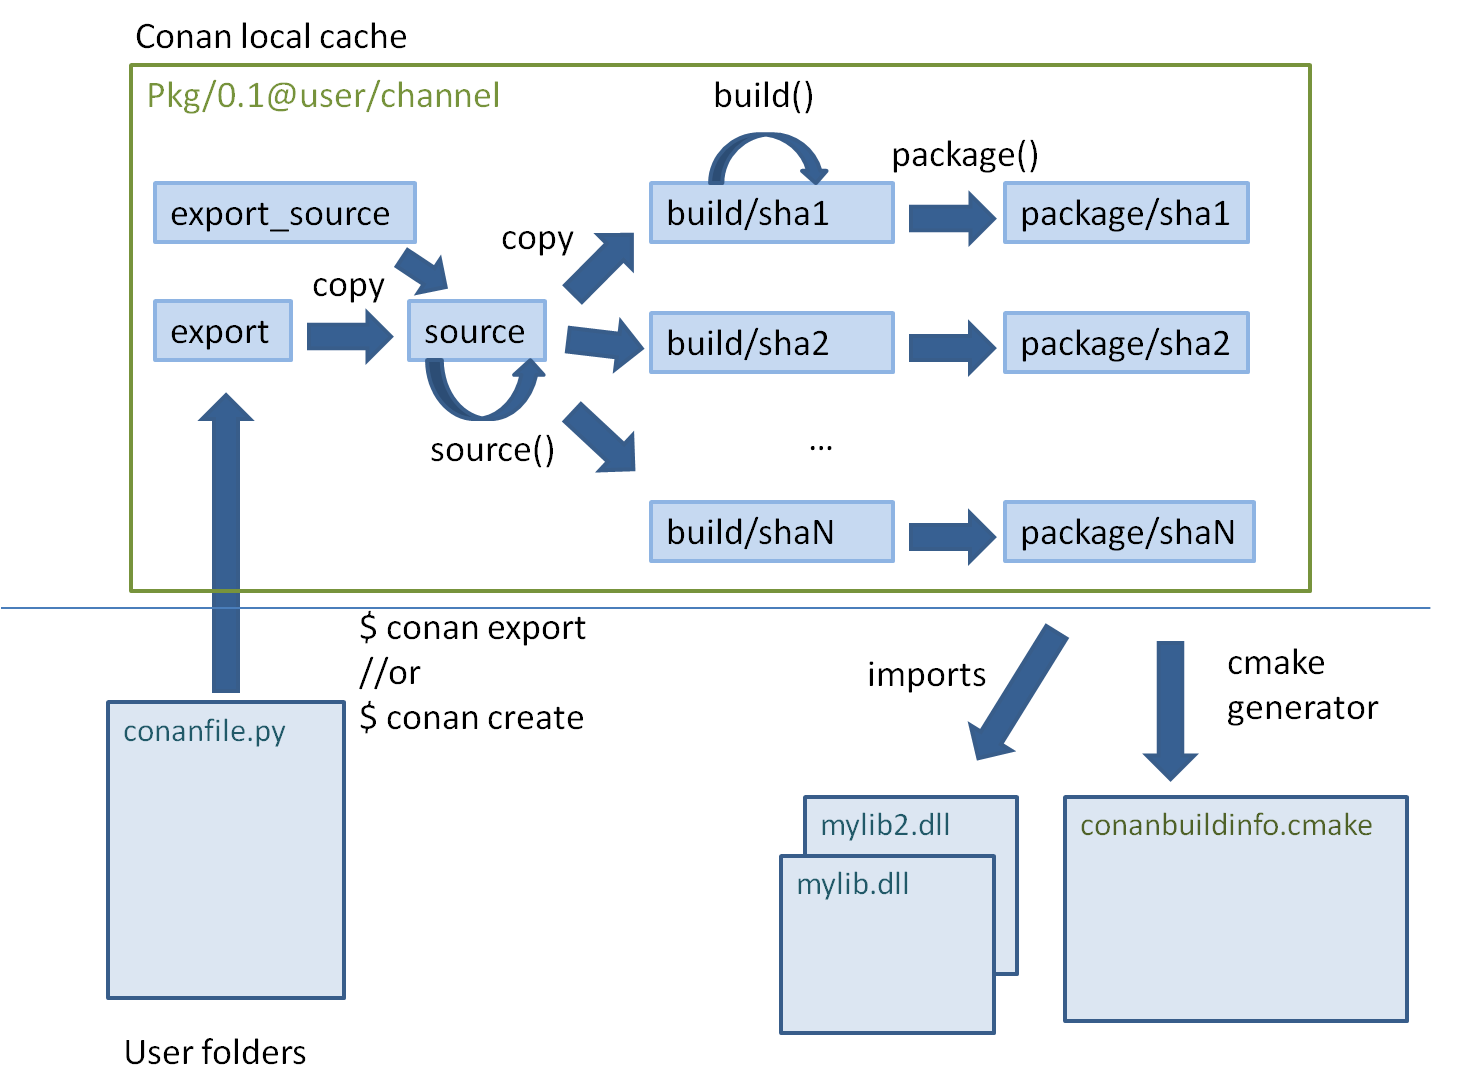
流程上是 source 到 build 到 package 的順序。
Export
如前一個步驟顯示的,Conan 在本地有個 cache 資料夾,用來放拉下來的檔案與原始碼。要發佈的套件也會聚合到該資料夾中,再使用指令發佈。將套件由專案複製到 cache 資料夾的動作,稱為 export。
既然已經 Build 好 Library,也打包好了,就可以將它 export 到 cache,用
conan export-pkg . hello/0.0.1@demo/testing --package-folder=./package --forceconan 會輸出
Exporting package recipe
hello/0.0.1@demo/testing: A new conanfile.py version was exported
hello/0.0.1@demo/testing: Folder: /home/ken/.conan/data/hello/0.0.1/demo/testing/export
hello/0.0.1@demo/testing: Exported revision: 462c799e9492d2bb12f798dbb0221759
hello/0.0.1@demo/testing: Forced build from source
Packaging to 0ab9fcf606068d4347207cc29edd400ceccbc944
hello/0.0.1@demo/testing: Exporting to cache existing package from user folder
hello/0.0.1@demo/testing: Package folder /home/ken/.conan/data/hello/0.0.1/demo/testing/package/0ab9fcf606068d4347207cc29edd400ceccbc944
hello/0.0.1@demo/testing: Packaged 1 '.h' file: hello.h
hello/0.0.1@demo/testing: Packaged 1 '.a' file: libhello.a
hello/0.0.1@demo/testing: Package '0ab9fcf606068d4347207cc29edd400ceccbc944' created
hello/0.0.1@demo/testing: Created package revision da06ef091676ea8e2f9b2348cf6c151b
其中
/home/ken/.conan/data/hello/0.0.1/demo/testing/package/0ab9fcf606068d4347207cc29edd400ceccbc944是輸出路徑。
Test Package
還記得前面有個 test_package 嗎?現在可以輪到它上場了。
雖然已經將 package export 到 local cache 了,但輸出的內容是否正確?能不能被用於應用程式建置?這些都需要測試。普通的測法是直接在應用專案中執行,如果能成功建置,跑起來也沒問題,就可以認為 export 正確。
而 Conan 將這步驟整合到 test_package 資料夾中,該資料夾可以當成是一個正式的應用專案,它的內容是
test_package/
├── CMakeLists.txt
├── conanfile.py
└── example.cpp
其中 conanfile.py 不是用於打包,而是用來建置並測試專案。example.cpp 是專案主要原始碼,由開發者自行編寫,內容通常會引用 Library 並輸出,好觀察行為是否正常。
先看 example.cpp
#include <iostream>
#include "hello.h"

int main() {
    hello();
}
引用 hello.h,並使用 function hello()。這些是剛剛打包的 package 內容。
再來看 conanfile.py
import os

from conans import ConanFile, CMake, tools

class HelloTestConan(ConanFile):
    settings = "os", "compiler", "build_type", "arch"
    generators = "cmake"

    def build(self):
        cmake = CMake(self)
        cmake.configure()
        cmake.build()

    def imports(self):
        self.copy("*.dll", dst="bin", src="bin")
        self.copy("*.dylib*", dst="bin", src="lib")
        self.copy('*.so*', dst='bin', src='lib')

    def test(self):
        if not tools.cross_building(self.settings):
            os.chdir("bin")
            self.run(".%sexample" % os.sep)
在 imports 中,引入依賴的 Library,放到 Build 下的 bin,好讓編譯時可以連結。
test 則是執行 bin 下建置完成的檔案。
執行命令,call test method,讓 conan 幫我們測試
conan test test_package hello/0.0.1@demo/testing
...
...
[ 50%] Building CXX object CMakeFiles/example.dir/example.cpp.o
[100%] Linking CXX executable bin/example
[100%] Built target example
hello/0.0.1@demo/testing (test package): Running test()
Hello World Release!
test 命令做了哪些事情呢?具體來講,會設定配置、引入需要的 package、輸出配置檔、建置程式、執行程式,跟正常的專案沒什麼不同,只差在它的目的是為了驗證 package 是否正常。
在執行後,可以看到出現
Hello World Release!跟前面建置的函式庫內容一致。
Upload
最後就是把 export 的檔案,由 local cache 上傳到 server,好讓其他人也能享用啦。
conan upload hello/0.0.1@demo/testing --all -r=my_local_server小結
conanfile.py 畢竟是 Recipe,跟其它 Recipe 的內容大同小異,都是用於描述如何建置、如何打包。比較特別的是,conanfile.py 有時可以用來單純建置,跟 Makefile 很類似,使用時要注意場合,否則容易弄混兩者的角色。
conanfile 的原理不複雜,實務上最大的麻煩,反而是寫 build method 的時候,能不能找到正確的 build 法。畢竟 C/C++ 有很多舊專案,技術文件不齊全,有時只有原始碼,連 auto-tool 都沒有,需要開發者自行補齊。Conan 算是在原有的 C/C++ 上再疊上一層,用現代化的套件管理技術賦予 C/C++ 更好的可用性。